
Two Ways to Check In: Event QR Codes vs. Personal Member QR Codes
EntriScan supports two check-in flows: attendees scanning a shared event QR code themselves, or staff checking members in from their personal QR code using a registered device. Here's how each works and when to use them.
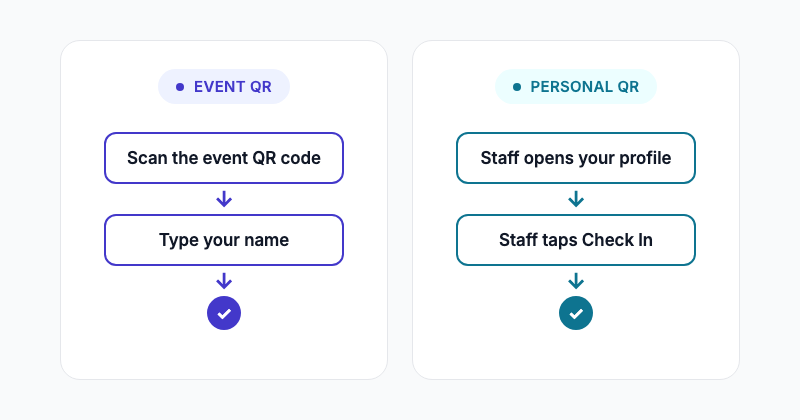
Not every organization checks people in the same way. Some want attendees to scan themselves in the moment they walk through the door. Others want a staff member or volunteer to control check-in, especially when they already recognize the person and just need to log the visit.
EntriScan supports both. This guide explains the two check-in flows, exactly how each one works, and how to decide which fits your organization.
Flow 1: Event QR code (self check-in)
This is EntriScan's core check-in method, and the one most organizations start with.
How it works
- You create an event and EntriScan generates a unique QR code for it.
- You display that QR code at your entrance - printed, on a screen, or shared as a link.
- Attendees scan it with their own phone's camera. No app to download.
- Scanning opens the event's public check-in page in their browser.
- They type their name and tap Check In. If it's their first time, they're added to your Members list automatically as a guest.
Everyone scans the same code, and everyone checks in on their own device. You can have dozens of people checking in at once with no line and no one waiting on staff.
Setting it up
- Go to Events in your dashboard and create or open an event.
- Find the QR code on the event's detail page.
- Print it, display it on a screen, or copy the check-in link to share directly.
That's the whole setup. It works the same way whether it's a one-time event or a recurring weekly session.
Flow 2: Personal member QR codes (staff-assisted check-in)
This flow is different: instead of one QR code for the event, every member has their own personal QR code tied to their profile. A staff member scans it (or opens the member's profile another way) and checks them in from there.
This is a good fit when you want a person at the door controlling check-in - for example, verifying identity, handling a front desk, or checking members in as they hand over equipment or sign in for a shift.
How it works
- Every member in your account has a personal QR code and a public profile page, found on their member detail page in your dashboard.
- A staff member registers a device - a phone or tablet they'll use at the door - once, from Devices in your dashboard. This generates a setup link/QR code.
- That setup code is opened one time on the staff phone. From then on, that phone is a recognized device for your account - no login needed on it going forward.
- When a member arrives, staff open that member's profile page on the recognized phone - by scanning the member's personal QR code with the phone's camera, or by finding them from a bookmark or search.
- Because the phone is a recognized device, the profile page shows a Today's events section with Check In (and Check Out, if enabled) buttons. Staff taps the button and the visit is recorded.
The member doesn't need to do anything except present their QR code or badge. Staff controls the check-in, and it's tied to a phone your organization already trusts - no shared login, no typing a password at the door.
A member's personal QR code is permanent. It's generated once when they're added as a member and never changes, so you never need to reprint a badge or regenerate a code for a new session. The Today's events section simply looks for whatever event is scheduled for that day - to keep the flow running, you just need an event on the calendar for that day, either a new one-time event or the same recurring event you already use every week.
Setting it up
- Go to Devices in your dashboard and click Add device. Give it a name, like "Front Desk Phone" or "Check-in Table 1."
- Open the setup link or scan the setup QR code on the physical phone you'll use for check-ins. This pairs that phone to your account.
- Make sure every member has been added to your Members list (import from CSV or add them individually). Each one automatically has a personal QR code and profile page - no extra setup needed per member, and nothing to redo later.
- Share each member's QR code with them (printed badge, ID card, or a link to their profile) so staff has something to scan at the door. Since the code never changes, this is a one-time step per member.
- Make sure there's an event scheduled for each day you check members in - create one-time events as needed, or set up a recurring event once and let it repeat automatically.
- On the recognized phone, open a member's profile to confirm the Today's events check-in button appears.
Event QR vs. personal QR: side-by-side
Event QR code
- Scanned by the attendee, on their own phone
- The attendee taps Check In
- Best for open events, high-volume entry, self-serve
- Setup: one QR code per event
- New attendees are added automatically as guests
Personal member QR
- Scanned by staff, on a registered device
- The staff member taps Check In
- Best for front desks, verified entry, staff-controlled logging
- Setup: one-time device registration, then it just works
- Requires the person to already be a member with a profile
Can you use both at the same time?
Yes. The two flows aren't exclusive. Many organizations display the event QR code for general attendees and guests, while a staff member at the door also has a registered device to check in members directly from their profile when needed - for example, a returning member who doesn't have their phone out, or a front-desk volunteer who prefers to control check-in personally.
Which one should you use?
Use the event QR code if:
- You want the fastest possible check-in with no staff involvement
- You expect guests or first-time attendees who aren't members yet
- You're running a single event, a class, or a recurring session with a fixed schedule
Use personal member QR codes with a registered device if:
- You want a staff member or volunteer to control and verify check-in
- Your attendees are already known members, not walk-in guests
- You want check-in tied to a specific device at your front desk, not open to anyone with the code
Availability
The event QR code check-in flow is available on every plan, including Free.
Personal member QR codes and profile pages are available on every plan, including Free. Checking members in and out directly from their profile page - the part of this flow that staff use at the door - requires the Professional or Community plan.
Questions? Reach us at [email protected].
Ready to try it?
Sign up free and explore all features. Upgrade to Professional to unlock the latest additions.